這一篇會記錄串接 API 的過程,還有參考「大量」排版的藝術 🤣。我會先把完整的程式碼顯示出來,再一點一點的說明過程。
Weather 元件
首先,因為我有使用 vue-router 所以要顯示的元件都必須要放在相對的路徑上,路徑的設定可以到 ./src/index.ts 來調整。
./src/components 裡建立 Weather.vue 元件,並把它加到 ./src/views/HomeView.vue 裡:
<script setup lang="ts">
import Weather from '../components/Weather.vue';
</script>

<template>
  <Weather />
</template>
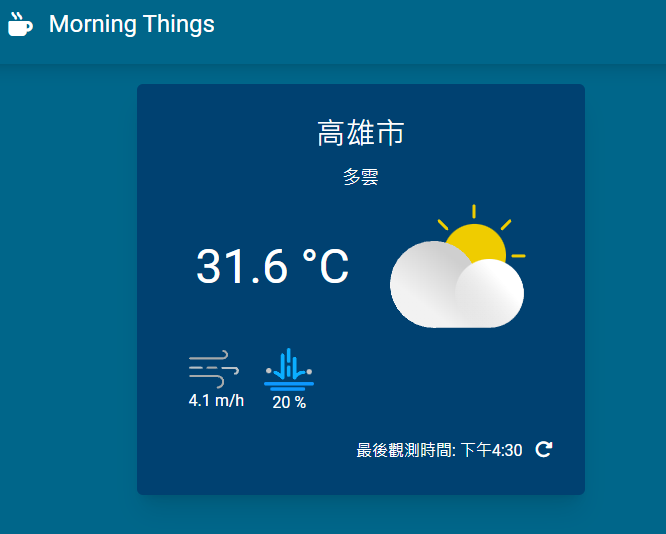
接下來,開始建立 Weather 元件,它會長得像:

程式碼的部分是:
<template>
  <WeatherCard>
    <Title :location="currentWeather.locationName" :description="currentWeather.description" />
    <div class="flex justify-center gap-10 items-center">
      <CurrentWeather :temperature="currentWeather.temperature" />
      <WeatherIcon :currentWeatherCode="currentWeather.weatherCode" :dayStatus="currentWeather.dayStatus" />
    </div>
    <div class="flex justify-start items-center gap-5 mt-5 px-5">
      <Airflow :wind="currentWeather.windSpeed" />
      <Rain :rain="percentageFormat" />
    </div>

    <div class="flex justify-end items-end mt-5 gap-3 text-right">
      <p class="text-mg">最後觀測時間: {{ dateFormat() }}</p>
      <button>
        <i class="fa-solid fa-rotate-right text-lg"></i>
      </button>
    </div>
  </WeatherCard>
</template>
外觀部分的 Tailwind 程式碼就不特別細說了,我也是根據以前的 CSS 經驗與查詢 TailwindCSS Docs 來套用的。
API Key
父元件(Weather.vue) 會獲取 API 的資料並傳給子元件們(./components/weather)。
首先,要先有 API Key 才能跟 氣象資料開放平台 請求 API。有 API Key 後我會在 root 底下建立一個 .env 檔案並把它放進去:
./.env
VITE_API_KEY=<Your API Key>
- 引入到
Weather.vue
<script setup lang="ts">
  const API_KEY = import.meta.env.VITE_API_KEY;
</script>
變數的前方一定要有 VITE_ 這樣 vite 才能拿到 (Env Variables and Modes)。
⚠️ 將機敏資料分開存放是很重要的
決定要抓取的資料
到 中央氣象局開放資料平臺之資料擷取API 來找尋需要的資料:

使用說明檔觀看欄位裡面的意義來決定要獲取哪些資料,並使用上面所提供的 Swagger 來預先設定資料型別與預設值:
interface IWeather {
  observationTime: string;
  locationName: string;
  description: string;
  temperature: number;
  windSpeed: number;
  humid: number;
  weatherCode: number;
  rainPossibility: number;
  comfortability: string;
  dayStatus: string;
}

// 預設資料
const currentWeather: IWeather = reactive({
  observationTime: '2023-6-05 12:10:00',
  locationName: 'NaN',
  description: 'NaN',
  temperature: 27.5,
  windSpeed: 0.3,
  humid: 0.88,
  weatherCode: 1,
  rainPossibility: 10,
  comfortability: '悶熱',
  dayStatus: 'night',
});
抓取資料
使用 axios 來獲取觀測資料:
const fetchCurrentWeather = async () => {
  // 這裡會先暫填高雄
  const url = `https://opendata.cwb.gov.tw/api/v1/rest/datastore/O-A0003-001?Authorization=${API_KEY}&limit=5&format=JSON&locationName=高雄`;

  try {
    const weatherData = await axios.get(url);

    // 取出資料
    const locationData = weatherData.data.records.location[0];
    console.log(locationData);

    // 將 WDSD(風速)、TEMP(溫度)、HUMD(相對濕度) 取出
    const weatherElements = locationData.weatherElement.reduce((neededElements: any, item: any) => {
      if (['WDSD', 'TEMP', 'HUMD'].includes(item.elementName)) {
        neededElements[item.elementName] = item.elementValue;
      }
      return neededElements;
    }, {});

    // 設定變數
    currentWeather.observationTime = locationData.time.obsTime;
    currentWeather.temperature = weatherElements.TEMP;
    currentWeather.windSpeed = weatherElements.WDSD;
    currentWeather.humid = weatherElements.HUMD;
  } catch (err) {
    console.log(err);
  }
};
我並沒有使用所有獲取的參數,只是先把它取好名字等需要的時候再添加即可。目前回傳的資料裡有使用到的是:
- 觀測時間 (observationTime)
- 溫度 (temperature)
- 風量 (windSpeed)
使用下一個 API 來獲取其他剩餘的資料:
// 獲得預測天氣 API
const fetchWeatherForecast = async () => {
  const url = `https://opendata.cwb.gov.tw/api/v1/rest/datastore/F-C0032-001?Authorization=${API_KEY}&format=JSON&locationName=高雄市`;

  try {
    const weatherForecastData = await axios.get(url);

    const locationData = weatherForecastData.data.records.location[0];

    const weatherElements = locationData.weatherElement.reduce((neededElements: any, item: any) => {
      if (['Wx', 'PoP', 'CI'].includes(item.elementName)) {
        neededElements[item.elementName] = item.time[0].parameter;
      }
      return neededElements;
    }, {});

		// 設定變數
    currentWeather.locationName = locationData.locationName;
    currentWeather.description = weatherElements.Wx.parameterName;
    currentWeather.weatherCode = weatherElements.Wx.parameterValue;
    currentWeather.rainPossibility = weatherElements.PoP.parameterName;
    currentWeather.comfortability = weatherElements.CI.parameterName;
  } catch (err) {
    console.log(err);
  }
};
回傳的資料裡有使用到的是:
- 地點 (locationName)
- 天氣描述 (description)
- 天氣現象代碼 (weatherCode)
- 降雨率 (rainPossibility)
特地說一下天氣現象代碼,它會根據所預測到的天氣現象來給一個代碼,這可以在一般天氣預報的說明檔找到每個代碼的意義,這個也就是變更天氣 Icon 所依循的機制。
說到天氣 Icon,我的 Weather Icons 又有分早上與晚上,所以這邊要再引入一個 API:日出日沒時刻 來知道今天的日出日落,以便算出目前的時間是白天還是晚上。
// 獲得日出日落時間 API
const fetchSunRiseSunSet = async () => {
  // 獲得目前日期
  let currentDate: string = new Date().toJSON().slice(0, 10);

  // 設定獲取日期的範圍:當前日期的後兩天
  let end: Date = new Date();
  end.setDate(end.getDate() + 2);
  let endDate = end.toJSON().slice(0, 10);

  // 從目前時間開始獲得日出日落的資料
  const url = `https://opendata.cwb.gov.tw/api/v1/rest/datastore/A-B0062-001?Authorization=${API_KEY}&format=JSON&CountyName=高雄市&timeFrom=${currentDate}&timeTo=${endDate}`;

  const sunAPIData = await axios.get(url);
  const sunRiseSunSetData = sunAPIData.data.records.locations.location[0];

  // 找尋資料內與現在日期一致的
  const locationDate = sunRiseSunSetData.time.find((time: any) => time.Date === currentDate);

  // 將日出、日落、現在時間,轉為 TimeStamp
  const sunriseTimestamp = new Date(`${locationDate.Date} ${locationDate.SunRiseTime}`).getTime();

  const sunsetTimestamp = new Date(`${locationDate.Date} ${locationDate.SunSetTime}`).getTime();

  const nowTimeStamp = new Date().getTime();

  // 如果目前的時間在日出與日落中間,那就是白天,其他時間為晚上
  currentWeather.dayStatus = sunriseTimestamp <= nowTimeStamp && nowTimeStamp <= sunsetTimestamp ? 'day' : 'night';
};
這樣就完成抓到所以我所需要的資料了,但是要如何讓它啟動獲取 API 的函數呢?
啟動抓取 API 函數
這裡有兩個狀況:
- 當畫面載入的時候自動抓取
- 當使用者按下重新整理圖式時抓取
第一個很簡單,使用 onMount() 即可:
<script setup lang="ts">
  import { onMounted } from 'vue';
  //...
  // 初始化
  onMounted(() => {
    fetchCurrentWeather();
    fetchWeatherForecast();
    fetchSunRiseSunSet();
  });
</script>
第二個就是在重整圖示按鈕上新增事件:
<div class="flex justify-end items-end mt-5 gap-3 text-right">
  <p class="text-mg">最後觀測時間: {{ dateFormat() }}</p>
  <button
	@click="
	  () => {
		fetchCurrentWeather();
		fetchWeatherForecast();
		fetchSunRiseSunSet();
		updateAPILimit();
	  }
	"
	:disabled="disabled.clicked">
	<i class="fa-solid fa-rotate-right text-lg"></i>
  </button>
</div>
既然有個按鈕,就必須要給他一些冷卻時間以防使用者一直點擊:
// 中央氣象局的更新頻率為 1 小時
const updateAPILimit = () => {
  disabled.clicked = true;

  setTimeout(() => {
    disabled.clicked = false;
  }, 2 * 60 * 1000);
};
處理資料傳給子組件
上面我已經把資料取出並序列化了,但是有些資料還是不能直接做於顯示使用的,例如:觀測時間 (observationTime)。為了能符合我所需要的,我把它調到我需要的格式:
// 優化 date
const dateFormat = () => {
  return new Intl.DateTimeFormat('zh-TW', {
    hour: 'numeric',
    minute: 'numeric',
  }).format(new Date(currentWeather.observationTime));
};
最後的成果會像:
<template>
  <WeatherCard>
    <Title :location="currentWeather.locationName" :description="currentWeather.description" />
    <div class="flex justify-center gap-10 items-center">
      <CurrentWeather :temperature="currentWeather.temperature" />
      <WeatherIcon :currentWeatherCode="currentWeather.weatherCode" :dayStatus="currentWeather.dayStatus" />
    </div>
    <div class="flex justify-start items-center gap-5 mt-5 px-5">
      <Airflow :wind="currentWeather.windSpeed" />
      <Rain :rain="currentWeather.rainPossibility" />
    </div>

    <div class="flex justify-end items-end mt-5 gap-3 text-right">
      <p class="text-mg">最後觀測時間: {{ dateFormat() }}</p>
      <button
        @click="
          () => {
            fetchCurrentWeather();
            fetchWeatherForecast();
            fetchSunRiseSunSet();
            updateAPILimit();
          }
        "
        :disabled="disabled.clicked"
      >
        <i class="fa-solid fa-rotate-right text-lg"></i>
      </button>
    </div>
  </WeatherCard>
</template>
程式碼部分同步在 et860525/Morning-things。
結語
子組件沒有細講是因為它們只負責接收資料並顯示,只有 Weather Icon 這個子組件要判斷什麼時候顯示哪個 Icon,這也是下一篇要說的。
