在初期建立部落格時,本來是想租一台虛擬主機,再把寫好的網頁丟上去,不過最後還是選擇使用 GitHub Pages。
Jekyll 是 Github 建議的靜態網站產生器,不過在查詢資料時發現由 Go 所建構的 Hugo,點進去網頁上面就寫著自己是「世界上最快的網站架設框架」,那不試試看怎麼行。
安裝 Hugo
Hugo 有兩種版本,標準版 (standard) 與擴充版 (extended),官方推薦使用 擴充版。
下載的方式是根據自己的作業系統來選擇,而我使用的是 Linux,其他的作業系統可以參考 Hugo Installation。
對於 Linux 系統,最簡單的方式就是直接使用 Package managers 下載:
sudo apt install hugo
但是用這個方式下載的通常都不是最新版本,所以 Hugo 還提供 Prebuilt binaries 的方式,下載前要先確定版本 (使用當下是 v0.109.0):
cd /tmp && mkdir hugo-binary && cd hugo-binary
wget https://github.com/gohugoio/hugo/releases/download/v0.109.0/hugo_extended_0.109.0_linux-amd64.tar.gz
tar -xvf hugo_extended_0.109.0_linux-amd64.tar.gz
cd ../ && rm -rf hugo-binary/
hugo version
最後如果有出現版本號就是成功安裝了。
初始化網站
使用以下得指令來建立專案的目錄:
hugo new site my_blog
進到資料夾裡找到 config.toml,這個是 Hugo 的設定檔。
如果你不喜歡使用
config.toml,Hugo 有提供config.yaml或config.json,在建立專案時使用hugo new my_project -f <yaml or json>
選擇主題
可以到 Hugo Themes 來選擇你想要的主題,我這裡使用 hugo-PaperMod:
cd my_blog
git init # 初始化 Git
git submodule add --depth=1 https://github.com/adityatelange/hugo-PaperMod.git themes/PaperMod
git submodule update --init --recursive # needed when you reclone your repo (submodules may not get cloned automatically)
接著將主題名稱加入 config.toml:
theme = "PaperMod"
通常下載的主題裡面都會有 exampleSite 或是將它獨立出來,都能在該主題的 Github 找到。exampleSite 裡都會有已經設定好的 config.toml 可以直接套用,也可以根據自己的需求來設定。
可以將
exampleSite的content裡的檔案都放進專案的content裡,這就是預設的文章,可以在運行網站時先預覽顯示的狀態
運行網站
hugo server
如果沒有任何錯誤,就可以到 http://localhost:1313 來觀看網站。
這個網站只運行在你的電腦上,要放到 GitHub Pages 上才能讓其他人看到
部屬到 GitHub Pages
首先,先在 Github 建立新的專案,名字為 <your-account>.github.io。
根據官方文件 Host on GitHub,使用 GitHub Action 來部屬網站,在根目錄下新增檔案 .github/workflows/gh-pages.yml,該檔案的程式碼為:
name: github pages

on:
  push:
    branches:
      - main  # Set a branch that will trigger a deployment
  pull_request:

jobs:
  deploy:
    runs-on: ubuntu-22.04
    steps:
      - uses: actions/checkout@v3
        with:
          submodules: true  # Fetch Hugo themes (true OR recursive)
          fetch-depth: 0    # Fetch all history for .GitInfo and .Lastmod

      - name: Setup Hugo
        uses: peaceiris/actions-hugo@v2
        with:
          hugo-version: 'latest'
          # extended: true

      - name: Build
        run: hugo --minify

      - name: Deploy
        uses: peaceiris/actions-gh-pages@v3
        if: github.ref == 'refs/heads/main'
        with:
          github_token: ${{ secrets.GITHUB_TOKEN }}
          publish_dir: ./public
完成後再把專案推上去:
git status
git add .
git commit -m "Init my hugo blog"
git branch -M main
git remote add origin git@github.com:<your-account>/<your-account>.github.io.git
git push -u origin master
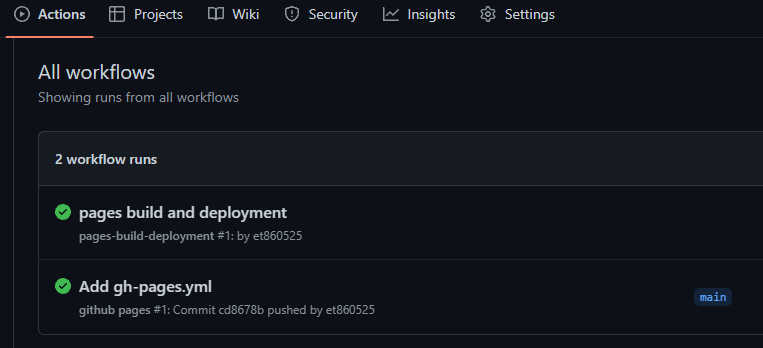
到該 repo 的 Actions 就會看到以下畫面:

如果有出現錯誤,請到 Repo -> Settings -> Actions -> General 確認
- Actions permissions 設定為 Allow all actions and reusable workflows
- Workflow permissions 設定為 Read and write permissions
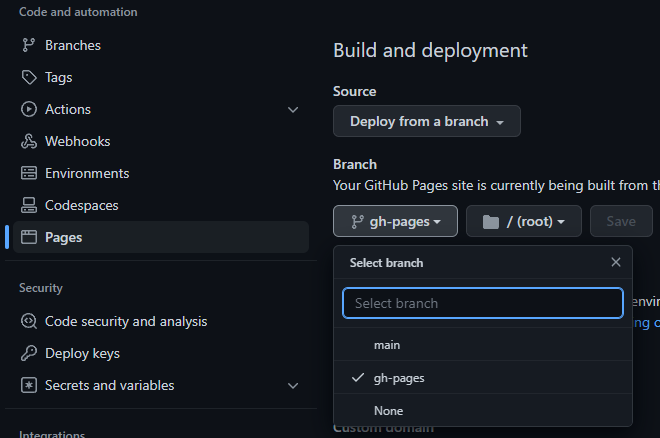
Actions 完成編譯後,設定 Github Pages 要使用的 branch:

最後再到 https://<your-account>.github.io/ 就能看到設定的頁面了。